Saturday, 28 November 2015

ZARP NETWORK ATTACK TOOL

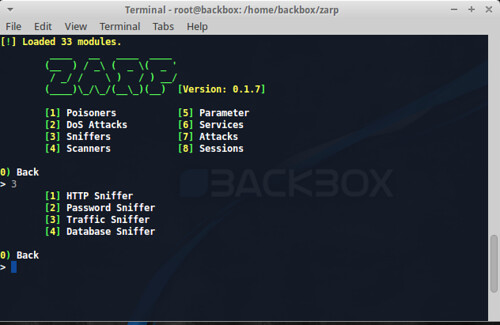
Zarp is a network attack tool centred around the exploitation of local networks. This does not include system exploitation, but rather abusing networking protocols and stacks to take over, infiltrate, and knock out. Sessions can be managed to quickly poison and sniff multiple systems at once, dumping sensitive information automatically or to the attacker directly.  

Various sniffers are included to automatically parse usernames and passwords from various protocols, as well as view HTTP traffic and more. DoS attacks are included to knock out various systems and applications. These tools open up the possibility for very complex attack scenarios on live networks quickly, cleanly, and quietly.
Features

zarp has around 30+ modules grouped into categories of attack and has multiple functionalities under each group:
  • Poisoners
  • Denial of Service
  • Sniffers
  • Scanners
  • Services
  • Parameter
  • Attacks

HOW TO INSTALL 

zarp is intended to be as dependency-free as possible. When available, zarp has opted to use pure or native Python implementations over requiring or importing huge libraries. Even as such, zarp requires the following to run:
  • Linux
  • Python 2.7.x
  • Scapy (packaged with zarp)
It is also recommended that user’s have the following installed for access to specific modules:
  • airmon-ng suite (for all your wireless cracking needs)
  • tcpdump
  • libmproxy (packaged with zarp)
  • paramiko (SSH service)
  • nfqueue-bindings (packet modifier) 


Zarp - Network Attack Tool

Usage

The Future

The long-term goal of this network attack tool zarp is to become the master command center of a network; to provide a modular, well-defined framework that provides a powerful overview and in-depth analysis of an entire network. This will come to light with the future inclusion of a web application front-end, which acts as the television screen, whereas the CLI interface will be the remote. This will provide network topology reports, host relationships, and more. zarp aims to be your window into the potential exploitability of a network and its hosts, not an exploitation platform itself; it is the manipulation of relationships and trust felt within local intranets.
 Download link : https://goo.gl/QvCcrf 

Vorlonjs Tool

An open source, extensible, platform-agnostic tool for remotely debugging and testing your JavaScript. Powered by node.js and socket.io. 

HOW TO INSTALL 

Install and run the Vorlon.JS server from npm: 
$ npm i -g vorlon
$ vorlon
with the server is running, open http://localhost:1337 in your browser to see the vorlon.JS dashboard .
You may notice errors from Python, node-gyp and socket.io. This is a known issue already reported to socket.io team. This is not a blocking issue though as socket.io still works well even with this error :)

Custom port

[Linux]
$ PORT=3000 vorlon
[Windows]
c:\>SET PORT=3000 && vorlon 
//Vorlon listening on port 3000
The last step is to enable Vorlon.JS by adding this to your app:
<script src="http://localhost:1337/vorlon.js"></script>

SSL Support

If you want to run the server with SSL support proceed as follows:
  1. Install Vorlonjs following the steps in Easy Setup
  2. Navigate to the installation folder
  3. Modify JSON file for activation SSL support
  4. In JSON file set to true
  5. If you want to replace our localhost certificate should only change the path of the files with the private key and certificate
  6. Exit and save JSON file

SSL Support on Azure

  1. Navigate to the installation folder
  2. Modify JSON file for activation SSLAzure support
  3. In JSON file set to true
  4. Exit and save JSON file
  5. Navigate with https protole on your Azure WebSite

Custom log file

By default Vorlon.JS application logs with debug level and files are stored in the installation folder. If you want to customize logs, proceed as follows : 1. Navigate to the installation folder 2. Modify JSON file, add or edit the "logs" section : - enableConsole : enabled logging to the console, - level : allowed values : info, warn, error - filePath : folder where log files should be store - vorlonLogFileName : name of Vorlon.JS log file, - exceptionsLogFileName : name of the log files for exceptions 3. Exit and save JSON file
[Windows]
C:\>cd %HOMEPATH%\node_modules\vorlon
C:\Users\Username\node_modules\vorlon>notepad Server/config.json

## JSON FILE ##
{
    "useSSL": true,
    "SSLkey": "server/cert/server.key",
    "SSLcert": "server/cert/server.crt",
    "includeSocketIO": true,
    "plugins": [
        { "id": "CONSOLE", "name": "Interactive Console", "panel": "bottom", "foldername" : "interactiveConsole", "enabled": true},
        { "id": "DOM", "name": "Dom Explorer", "panel": "top", "foldername" : "domExplorer", "enabled": true },
        { "id": "MODERNIZR", "name": "Modernizr","panel": "bottom", "foldername" : "modernizrReport", "enabled": true },
        { "id" : "OBJEXPLORER", "name" : "Obj. Explorer","panel": "top", "foldername" : "objectExplorer", "enabled": true },
        { "id" : "XHRPANEL", "name" : "XHR","panel": "top", "foldername" : "xhrPanel", "enabled": true },
        { "id" : "NGINSPECTOR", "name" : "ngInspector","panel": "top", "foldername" : "ngInspector", "enabled": false  }
    ],
    "logs": {
        "level" : "info",
        "enableConsole" : true,
        "filePath" : "E:\\temp",
        "vorlonLogFileName": "vorlonjs.log",
        "exceptionsLogFileName":  "exceptions.log"
    }
}

C:\Users\Username\node_modules\vorlon>vorlon
Vorlon with SSL listening on port 1337

With the server is running, open https://localhost:1337 in your browser to see the Vorlon.JS dashboard.
The last step is to enable Vorlon.JS by adding this to your app:
<script src="https://localhost:1337/vorlon.js"></script>

Documentation

Read further documentation about Vorlon.JS, and writing your own plugins athttp://vorlonjs.com/documentation.

Developing on Vorlon.JS

If you wish to work on Vorlon.JS's server or core plugin code, you'll need to clone this directory and work in it.
Vorlon is written in typescript, which is compiled with gulp. There are two main directories:

Compiling from source

There is a gulpfile.js in each of the Plugin and Server directories, which compiles gulp to typescript. In addition, /Plugins/gulpfile.js ensures that the compiled plugin code is copied in to the right place in the Server directory.

Compiling

The simplest way to run Vorlon.JS is to run npm start from the root directory. This will run both gulpfiles to compile typescript and start the server.

gulp watch

You can also run the gulp commands individually. This is useful if you wish to work on plugins in particular, as gulp watch will compile typescript for you automatically.
If you want to run gulp commands from command line, you will need to first install gulp globally on your system with:
$ npm install -g gulp
You can now run gulp watch from the Server or Plugin directories to have gulp compile typescript to javascript automatically.

Plugin test page

There is a demo webpage that includes the vorlon code that you can open to test the dashboard behaviour. It lives at ./Plugins/samples/index.html. There is a gulptask in the Plugins gulpfile to host it, just run gulp webserver, and then navigate to http://localhost:1338/index.html to view the page.

Visual Studio users

For Visual Studio users, we provide an integrated solution through VorlonJS.sln. In order to interact with Node.js, you just need to install the NodeJS Tool for Visual Studio plugin. Once the plugin is installed, just open the solution and you'll be ready to develop for Vorlon.js.

Committing & Pull Requests

Once you've made a change, you can commit and submit a pull request to this repository. You will also need to electronically sign the `Microsoft Contributor License Agreement (CLA)[https://cla.microsoft.com/] if you wish for your changes to be merged.
When committing changes, ensure that compiled JavaScript files (those compiled from TypeScript) are not committed, only the original TypeScript files should be committed.